Smart Business for Your Business.
 
SHOP BY
 
 
KEYWORD
 Products carat Electric Screens

dalite logo
Due to Da-lite's recently implemented Minimum Advertised Price policy, our pricing is too low to show. Please call (800-338-5370) or email us at biz2bizonline@live.com for our low price.
line

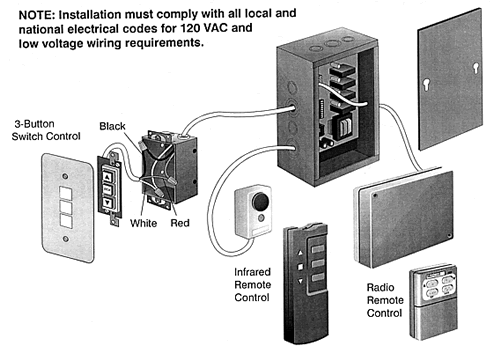
Dual Motor Low Voltage Control System : Recommended Installation and Wiring Instructions

LOW VOLTAGE WIRING INSTRUCTIONS

LOW VOLTAGE WIRING INSTRUCTIONS

Switch Control Wiring


  • Mount the 3-button switch(es) in a standard gang box at the desired location(s).
  • Run three low voltage wires to the 2 gang box from each 3-button switch, and connect the black, red and white wires to the switch interface terminal as indicated in the drawing above.


OPTIONS


Radio Remote Control Connection


  • Securely attach the radio receiver adjacent to the controller.
  • Attach the plug from the receiver into the telephone jack on the control board as indicated in the drawing above.
  • If it is necessary to change the transmitter and receiver code, please call the Da-Lite Customer Service Department at 1-800-622-3737 or 219-267-8101 for instructions.


Infrared Remote Control Connection

  • Securely attach the IR sensor at a location close to the screen, but visible from where the transmitter will be operated.
  • Attach the plug from the sensor into the connector on the control unit as indicated in the drawing above.


Auxiliary Control Connection

  • Run wires to the Low Voltage Control from the Auxiliary Control location and connect the black, red and white wires to the switch interface terminal as indicated in the wiring diagram above.
  • A closure of 0.5 seconds between the Black and White terminals moves the screen Up.
  • A closure of 0.5 seconds between the Red and White terminals moves the screen Down.
  • A simultaneous closer of 0.5 seconds between Up, Down, and Common will STOP the screen in its current position.


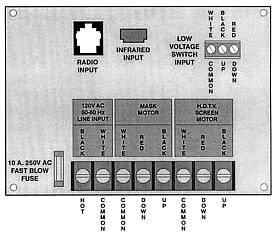
LINE VOLTAGE WIRING INSTRUCTIONS

WIRING STEPS FOR DUAL MASK ELECTROL

WIRING STEPS FOR DUAL MASK ELECTROL

  1. Connect the motor cable to the Dual Motor Low Voltage Control per the wiring chart below.
  2. Connect the 3-button switch or the wireless controller.
  3. Connect the power source to the control box, and then apply power.
  4. Install the cover plate on the control box.
  5. Test the projection screen and the mask using the following procedure:
  • Press the DOWN button and the projection screen descends.
  • Press DOWN button again and the mask descends.
  • Press the UP button and the mask ascends.
  • Press the UP button again and the projection screen ascends.


NOTE: A 10 Amp, 250 VAC fuse protects the controller in case of a wiring problem. This standard fuse can be found in any electrical supply store

CAUTION GROUNDING CONTINUITY: If metallic conduit is not used throughout the screen and control installation, grounding conductors are required to provide a ground continuity between the screen and the control unit

WIRING STEPS FOR ELECTROL WITH VIDEO LIFT

WIRING STEPS FOR ELECTROL WITH VIDEO LIFT

  1. Connect screen motor and video lift cable to the control box per the instructions below.
  2. Connect the 3-button switch or the wireless controller.
  3. Connect the power source to the control box, and then apply power.
  4. Install the cover plate on the control box.
  5. Test the screen and lift using the following procedure:
  • Press the DOWN button and the projection screen descends.
  • Press DOWN button again and the mask descends.
  • Press the UP button and the mask ascends.
  • Press the UP button again and the projection screen ascends.


NOTE: A 10 Amp, 250 VAC fuse protects the controller in case of a wiring problem. This standard fuse can be found in any electrical supply store.

CAUTION GROUNDING CONTINUITY: If metallic conduit is not used throughout the screen and control installation, grounding conductors are required to provide a ground continuity between the screen and the control unit


NOTE: The information contained herein is believed to be accurate and reliable as of the publication date, December, 1999. Please consult Da-Lite to ensure that you have the most up-to-date product specifications. Da-Lite reserves the right to update, change or improve this product without prior notice.


Valid XHTML 1.0 Transitional       
Valid CSS!